Authentic Filipino Cuisine in the Outer Boroughs

FullSizeRender
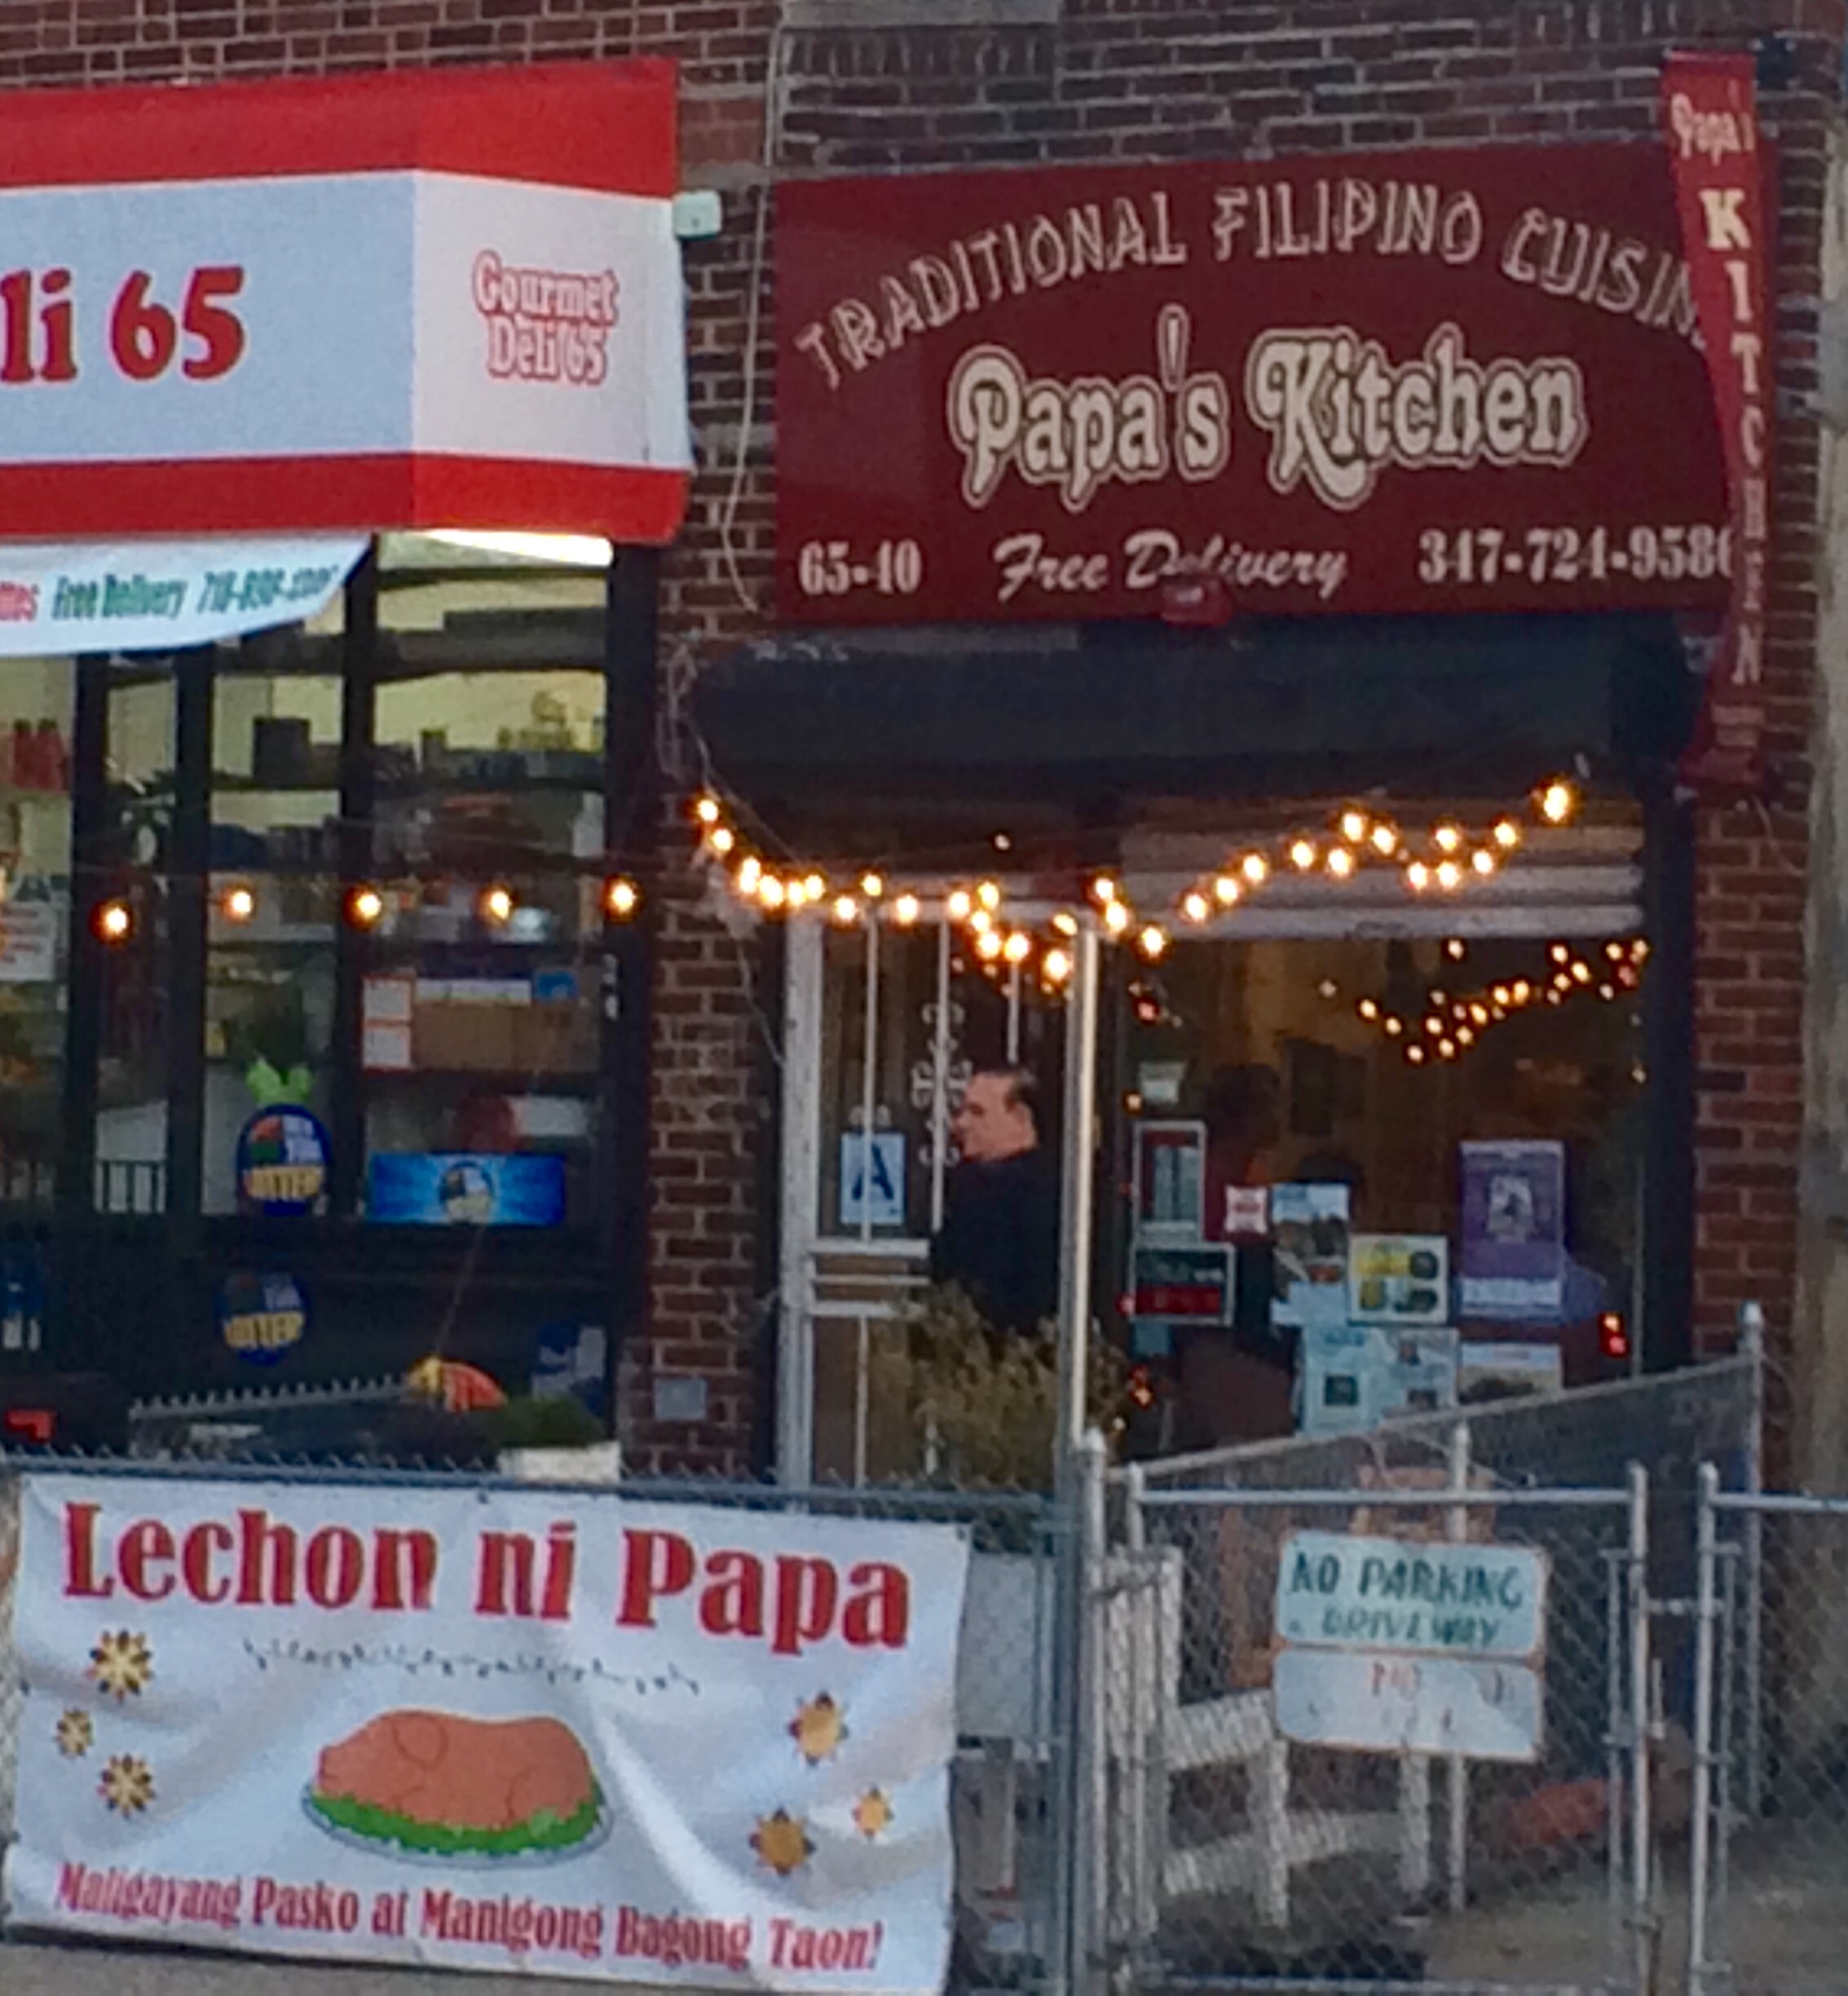
Last weekend, I was planning to attend a Greek Easter party (my first) in Queens, NY, when my friend asked if I wanted to grab some dinner before the party. Who am I to say no to dinner? So we made plans to meet up with a couple of others on Saturday night Filipino food at Papa’s kitchen in the Woodside neighborhood of Queens. As I walked the few blocks from the 7 train to where Google was telling me the restaurant was located, I noticed it seemed a bit residential. Were we going to one of these underground restaurants starting to pop up around NYC the last few years? Or maybe a dinner party through something like Feastly? Alas, while eating in Papa’s Kitchen at times felt like you were in someone’s home, it is definitely a bonafide foodery, but with homely charms.
FullSizeRender-4Opened in October of 2012, Papa’s Kitchen is co-owned by a brother and sister team. Beth, is the hostess, as well as waitress and basically the entire front of the house staff. Her brother is the chef, and perhaps the Papa of the kitchen? The restaurant itself was super cozy; an intimate,
hole in the wall–in best way possible. Beth was super friendly, and even spoke to my friend in Tagalog. As a waitress she was very attentive, which admittedly was probably easy since the space was small–my estimate was 2-3 small as well as 2 larger tables. We were a party of four, so were lucky to have a great window booth in the front.
IMG_1802This place is all about no frills, simply authentic Filipino cuisine. The tables were simply decorated with the food served on styrofoam plates covered with banana leaves with plastic cutlery. The food is not out of the box or super modern, but that’s what makes it great. Personally, I feel that places like Papa’s are missing from the NYC food scene today. Here it’s all about the pure home dishes, and all of the food tasted fresh and home cooked. Food > frills any day!
Oh, not to be forgotten, this place is BYOB, with a decent liquor store down the block. Plus, they have karaoke (for free)! Although it was king of a hard sell–a tad aggressive lol–it made the atmosphere kind of awesome.
FullSizeRender-7
Most important though is the food! Since I wasn’t as familiar with Filipino cuisine as my friend, I let him take the lead and just focus on eating, and singing of course. We started with the Shanghai ($7.95) or Lumpia Shanghai, which is perhaps one of the most well-known Filipino foods. In fact, there are restaurants like Lumpia Shack in Brooklyn and the West Village that specialize in these Filipino spring rolls. Naturally, these seemed like a good place to start our meal. The Lumpia were a little greasy, but made them more authentic. They were extra crispy with a nice crunch, and reminded me of a Middle Eastern cigar dish. They came with a pork filling that was deliciously moist, and a spicy dipping sauce on the side that reminded me of sriracha. Ten of them came in the order, so we were all able to have a couple.
FullSizeRender-9
Next up was the Pancit Palabok/Luglug ($8.95), a dish of thick udon-esque noodles that were cooked in a shrimp sauce with cabbage. The noodles themselves were nice and aromatic with a great chew. The boiled egg and pork rid garnishes provides a nice textural contrast. The lemon, when squeezed over the noodles, provided some much-needed acid to balance out the heaviness of the noodles.
FullSizeRender-5FullSizeRender-2
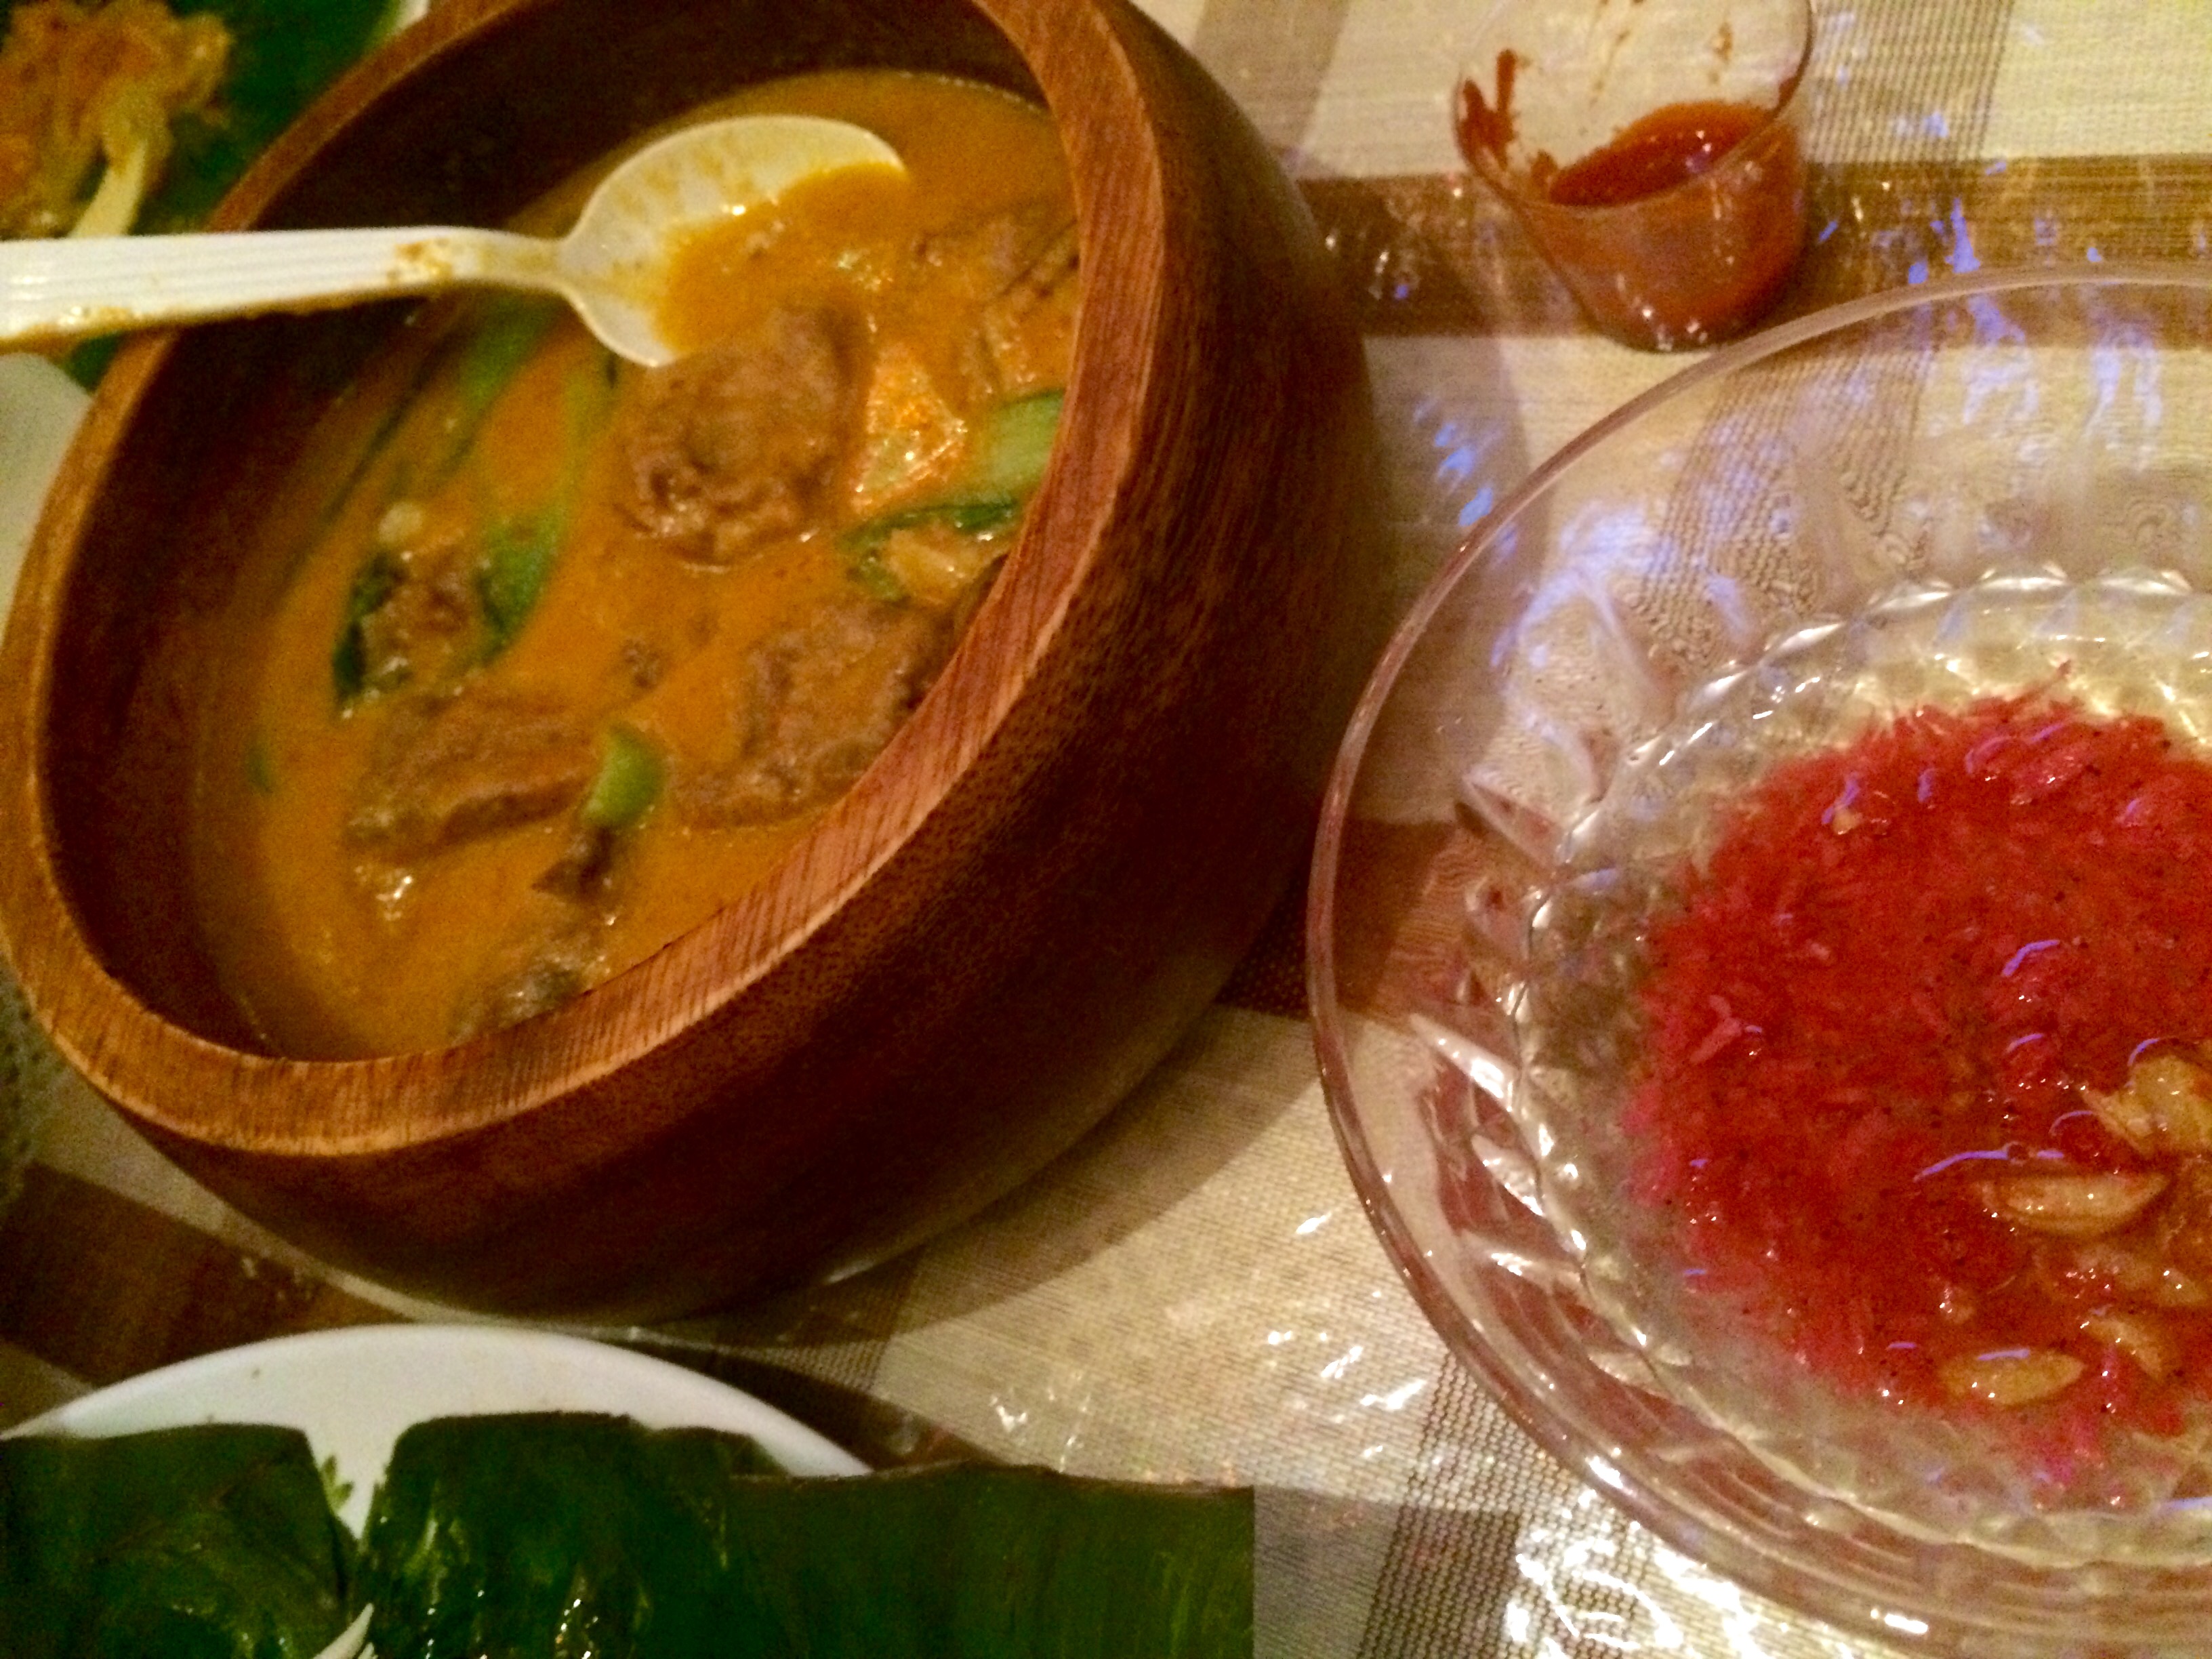
The Kare Kare ($12.99) entrée came out about the same time as the noodles, along with a large communal bowl of rice. The dish consisted of beef stewed with eggplant, bochnoy (a version of boo choy?) and string beans in peanut sauce. The beef was super tender and the string beans retained a nice crunch. The rice was great to soak up the sauce. A salted shrimp liquid garnish elevates the curry like dish from almost bland compared to the other dishes. Using some of the chili sauce was great with the Kare Kare as well.
FullSizeRender-3
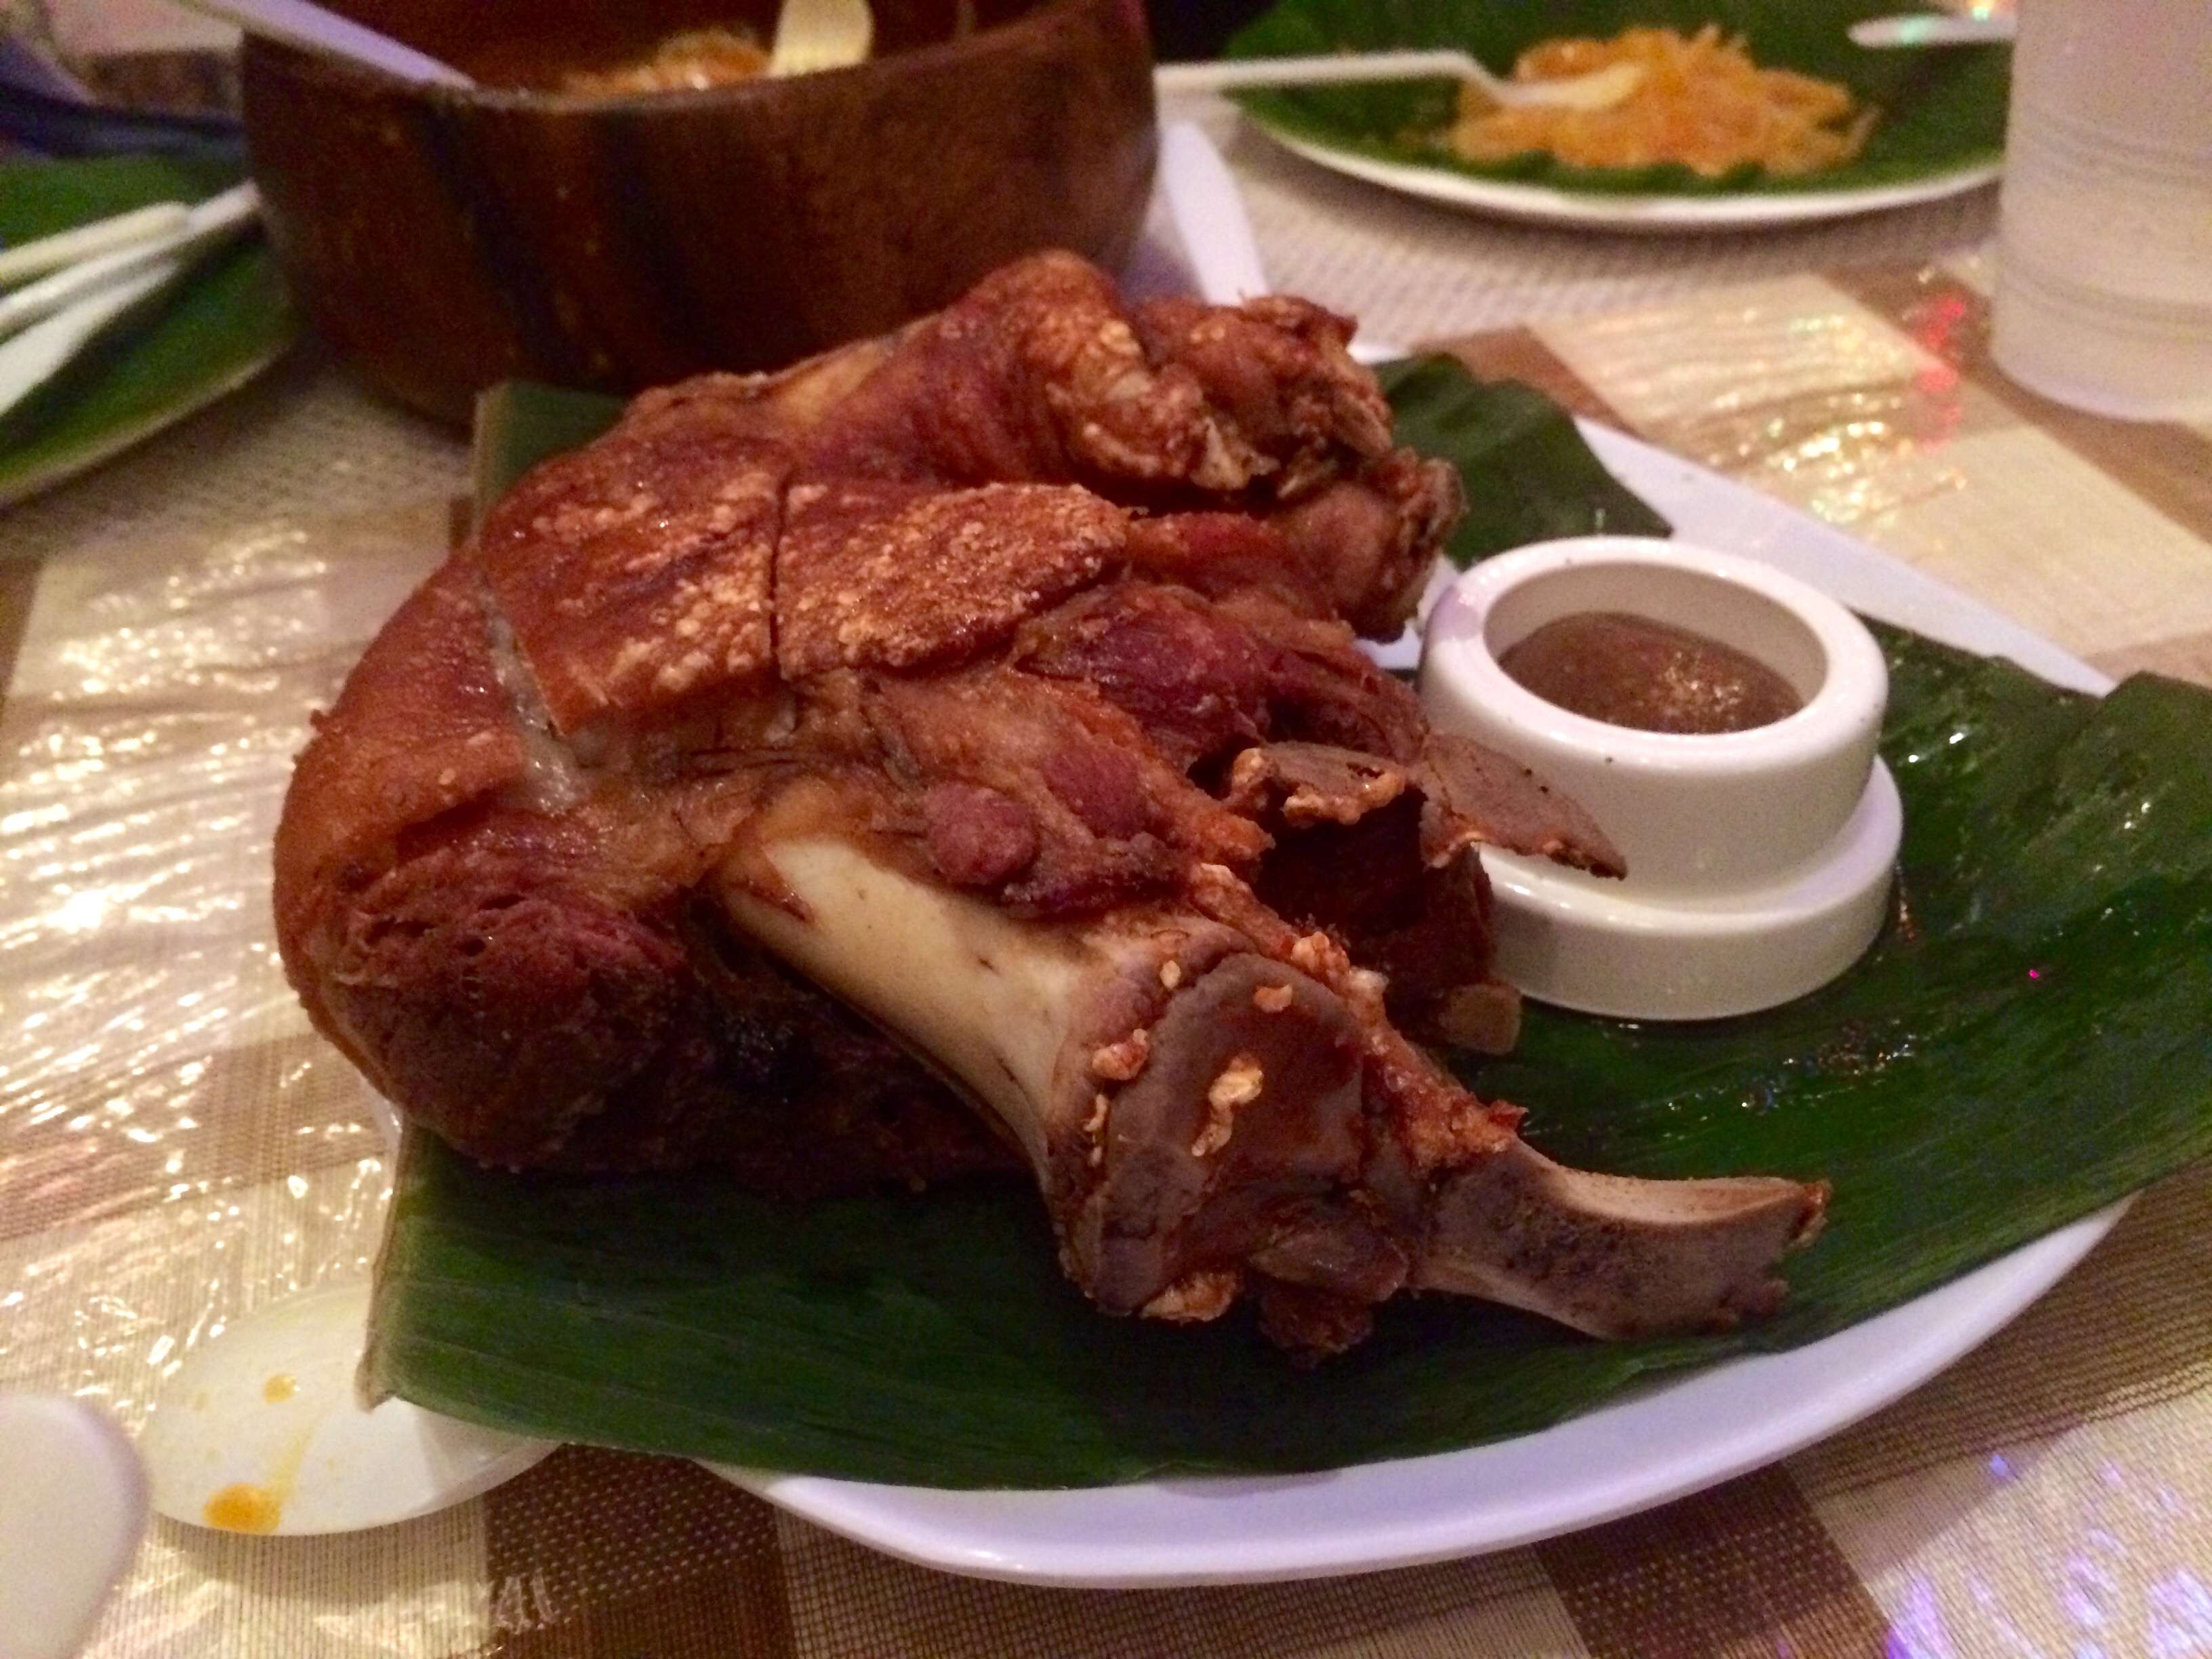
The most anticipated dish, for me at least, the Crispy Pata ($14.99) was up next. To summarize in one word: Yum! Pata refers to the pork, in this case a pig’s trotter or foot, although it doesn’t look like a foot at all when it comes to the table. The Pata lived up to its crispy moniker with the super crispy skin–almost like cracklings. The meat underneath the skin was fatty and delicious, and so moist that we used our hands to tear it off the bone. There was a nice spicy sauce on the side to slather on the meat, and a separate dipping sauce for the skin of chili vinegar. The chili vinegar was tangy with a nice bolt heat, but not too strong. It was a nice break from the heavy meat and helped cut through the fat of the pork.
FullSizeRender-8
While the Crispy Pata might have been the showstopper, the dark horse might have been the vegetable dish of the night, Sitaw n Kalabasa ($10.99). The menu makes a point to note that this dish was in the vegetable, but not vegetarian category. Maybe that’s why the veggies were so hearty. It sounds simple enough, pumpkin and Asian string beans in coconut milk, but the combo was magical. The chunks of pumpkin were plump and tender, but not overcooked. They had an almost potato like meatiness, without the heft that often makes potatoes turn mealy in curry dishes. The pumpkin skin was edible as well. The coconut milk sauce was super creamy and perfectly blanketed the vegetables.
FullSizeRender-10
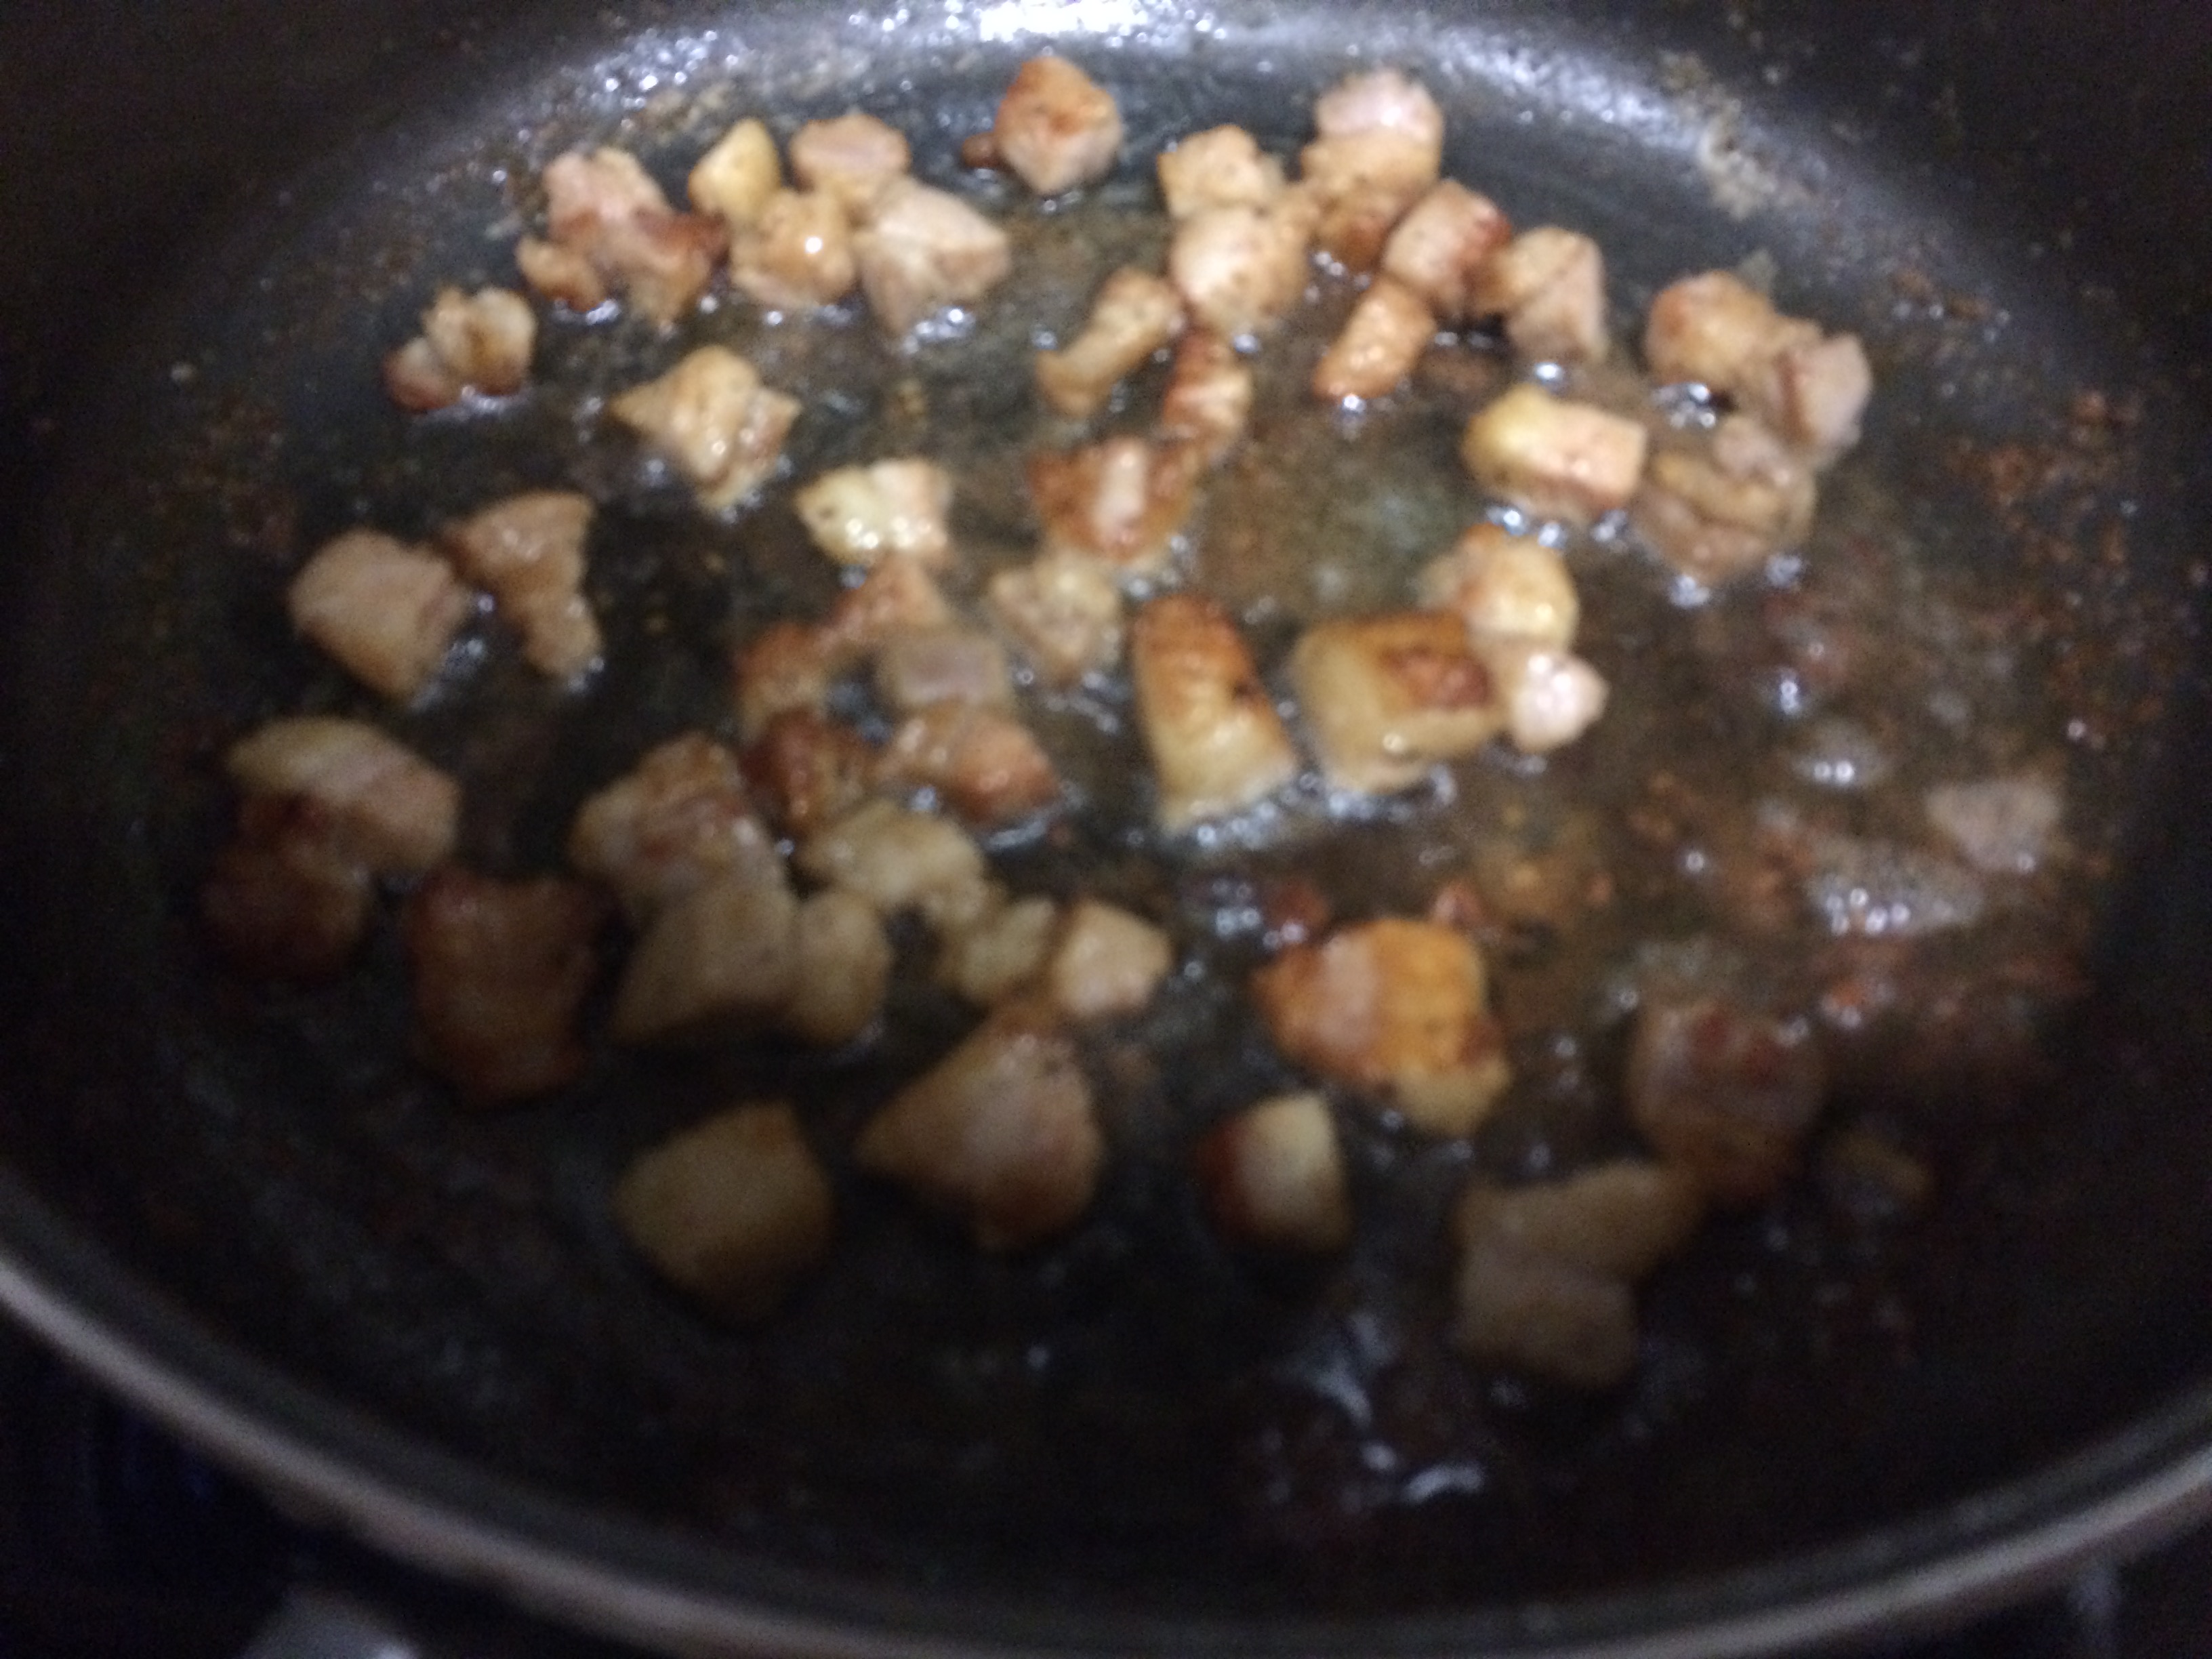
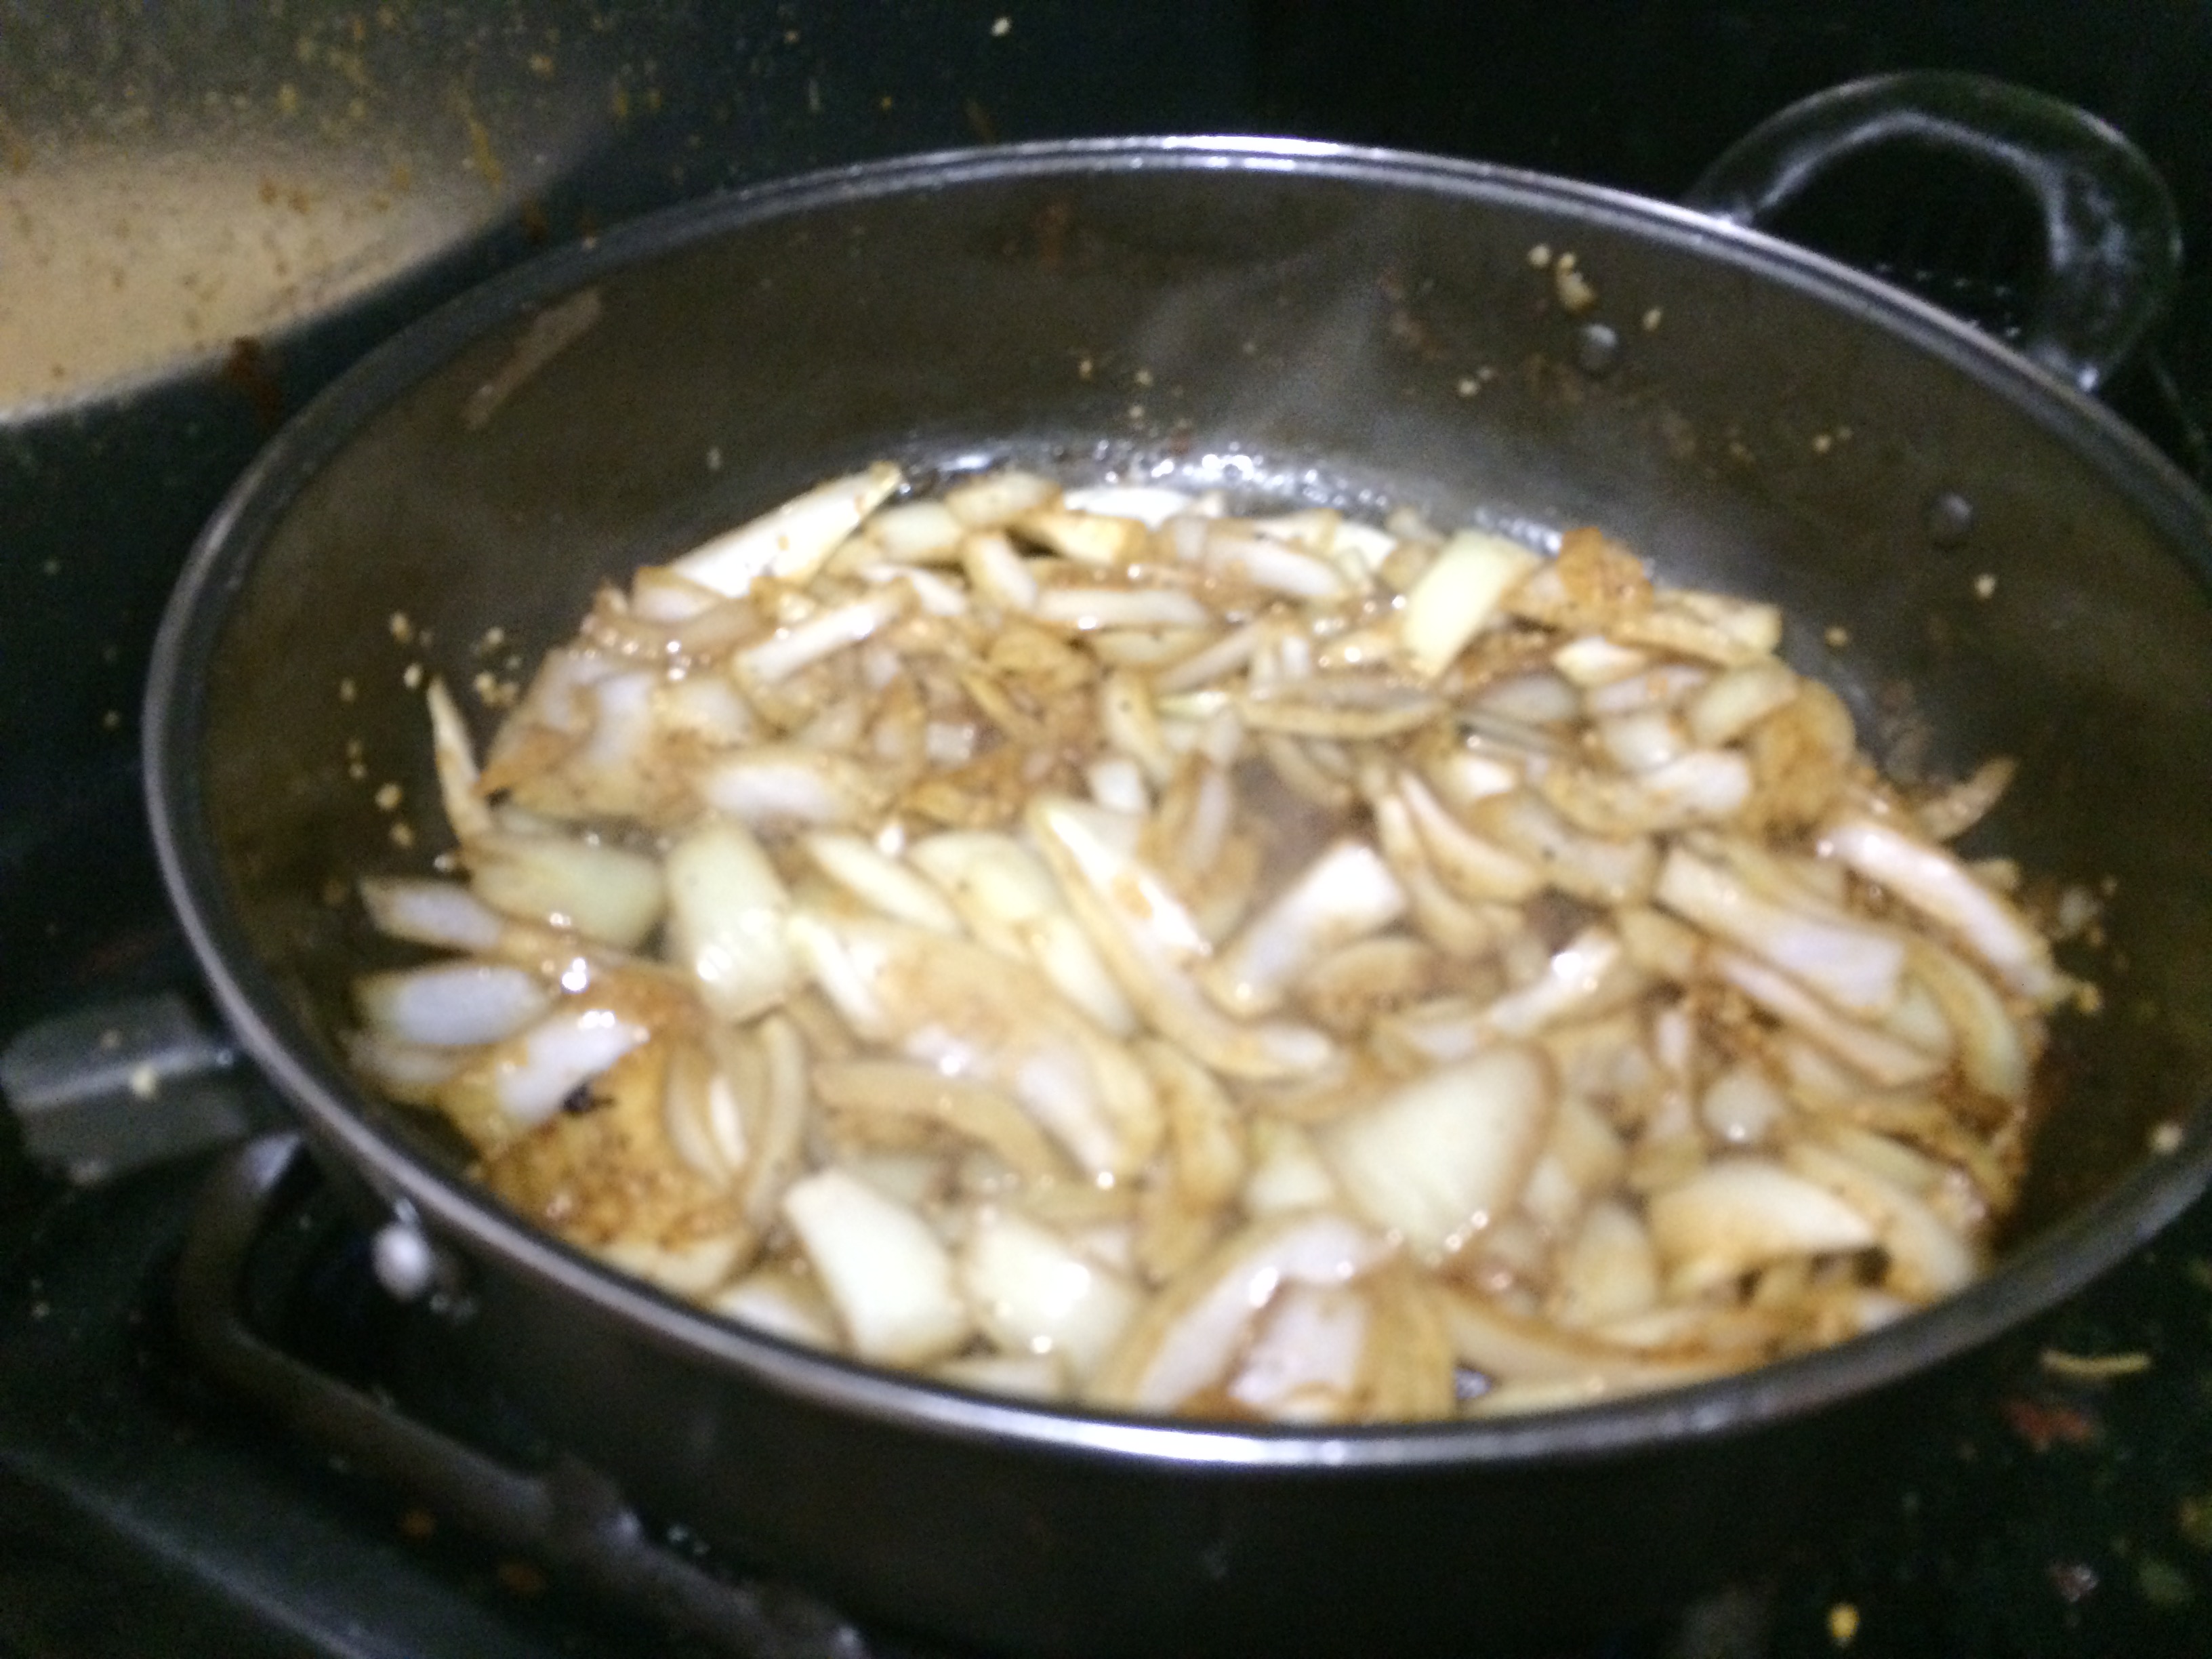
While we were waiting for our final dish, my friends decided to order a bonus dish, as if we needed anymore, but this allowed me to sample some more Filipino cuisine, so yay! Our order of Pork Adobo ($10.99) was interesting. The pork was braised, so it was slightly meow toothsome than the Pata, but not in a bad way. If that meat was pull apart tender, then this one was almost like a grilled texture. The pork was tossed with red onions that had a salty bite to them. The onions were cooked through, but with a crunch–an almost stir fry texture. The pork was dressed with a tangy, greasy sauce with hints of acid throughout, probably from the soy sauce and vinegar used in the braise. Overall, the dish was pretty addictive; it has a building flavor, and the combination of salty and sour made me keep eating it. I especially loved having some do the rice that soaked up the adobo sauce.
FullSizeRender-6
Up last was the Chicken Tinola ($11.99), which was listed as chicken cooked in a ginger broth and is exactly what you get. I somehow felt that this dish should have come out at the beginning of the meal as a starter. Beth brought the clear chicken broth to the table (in a bowl that I actually have at home), and served it to us in bowls at the table. The broth was deeply aromatic and slightly funky from the ginger. The soup had sliced red onions floating throughout, as well as knobs of fresh ginger, bok choy, and pieces of chicken on the bone. The chicken had been cooked in the broth. The chicken meat ended up being nice and tender with a subtle ginger flavor. The real star of this dish was the broth though. Even though it was the end of our meal, I ended up drinking multiple small bowls of the broth. There was a lot leftover, so I wish that I had been heading home afterwards in order to take leftovers for the rest of the weekend.
FullSizeRender-11
Since the place was BYOB, one of our group went to a store down the block and got a six-pack of Modelo beer, which is from Mexico. The beer was light and refreshing, and just a lIttle bit sweet. Plus, it came in a cool bottle.  Overall, the food was delicious and super tasty. This is definitely a place to come back to soon, and I definitely feel like I’ve gotten a taste of the Philippines.

Recipe: Chicken Parmigiana Meatballs

I’ve been thinking about how to put a twist on some classic dishes lately. One of my favorites is Chicken Parmigiana. Who can resist the call of crispy chicken, hearty tomato sauce, and gooey cheese? Not this guy. But there are only so many ways to reinvent the wheel when it comes to a good chicken parm. So, I thought, “what about chicken parmigiana as a meatball?” and the idea for this dish was born. These meatballs have all the aspects of a plate of chicken parm that you love, without all of the work, and in a new, unique way.

Ingredients:

IMG_18891-2 lbs of ground chicken—I like white meat, but if you’re afraid of your meatballs drying out, then dark meat is delicious. Same thing with ground turkey

1 tablespoon of minced garlic

1 teaspoon of minced onion, dried

1 teaspoon of salt

1/2 teaspoon of pepper

1 egg

IMG_18861/4 cup of wheat germ—breadcrumb lam work well too, but I think the wheat germ in the actual meatball gives it a little bit of sweetness that you often find in slow cooked chicken parmigiana dishes

IMG_18911 ball of fresh mozzarella

1/2 cup of Panko breadcrumbs

1/2 cup and 1-2 tablespoons of Parmesan cheese

1/2 teaspoon of crushed red pepper flakes (use a sliding scale depending on your preference)

1/4 teaspoon of basil, dried

1-2 cups of tomato sauce (see recipe here)

To Make the Meatballs:

  1. Preheat your oven to 400 degrees.
  2. In a bowl, mix ½ cup of Parmesan cheese with the Panko breadcrumbs, and set aside
  3. Cut a few slices of the mozzarella, about ½ of the ball, and cube all but 2 of them
  4. In another bowl, combine ground chicken, wheat germ, egg, salt, pepper, basil, garlic and onion together in a bowlIMG_1890
  5. Mix the meat mixture, but not too much, just until it becomes homogenous
  6. Grab about 1/8 of the meat mixture and form into a small patty
  7. Use your thumb to make a small well in the center of the patty and place a couple of cubes of cheese there
  8. Use your fingers to curl the meat around the cheese into a ball and your other hand to seal the edges. All do the cheese should be covered by meat so it doesn’t leak out
  9. Roll the meatball in the Parmesan breadcrumb mixture until coated all over
  10. Place the coated meatballs on a greased baking sheet, evenly spaced apart
  11. Put the meatball sheet into the refrigerator for about 30-60 minutes, or 15-20 minutes in the freezer to firm up
  12. Add a bit of olive oil to the top of each meatball before bakingIMG_1899
  13. Bake in the oven for 15 minutes
  14. Once they’re starting to brown, flip the meatballs and bake for another 15 minutesIMG_1903
  15. Remove the meatballs from the oven and turn the heat up to 425 degreesFullSizeRender-2
  16. In a small baking dish, or a large one, if you’d like to do them all at once, place your meatballsIMG_1902FullSizeRender-6FullSizeRender-7
  17. Cover with 1-2 cups of the tomato sauce and the remaining cheese
  18. Bake the meatballs again in the oven for 6-8 minutes. You just want to get the meatballs to absorb some of the sauce, and the cheese to melt nicelyIMG_1912

Serve and enjoy! I like mine with a nice Caesar salad on the side, but these would be great with some pasta tossed in the same tomato sauce, on a sub, as a topping for pizza, or even as an appetizer. You’ll love this twist on your normal meatball recipe. Go balls to the wall! 😉

FullSizeRender-3

Recipe: Everyday Special Tomato Sauce

I am a self-labeled foodie, and I love cooking as much as going out to eat…but I’m also a foodie on a budget. So, I’m always looking for ways to save some money, while at the same time not skimping on the flavor. One of the easiest and tastiest ways I’ve found is by making my own sauces. A quality jar of tomato sauce at the grocery store can run you anywhere between $5-$10. What I like to do is buy the much cheaper canned tomatoes, and make my own sauce at home. Not only will this save a lot of $ over time, but I can flavor it exactly as I like.

This is sauce that I came up with a few years ago and it’s my go to tomato sauce recipe. Flavored with garlic, oregano, crushed red pepper as basil, it has a bold, all day taste, but can be made in 30 minutes.

Ingredients:

IMG_18971 28 oz can of whole peeled tomatoes—I prefer San Marzano because they’re sweeter, but any brand works. Just make sure they’re not flavored with anything. Also, don’t get tomato purée or sauce in a can, ugh.

1 package of grape or cherry tomatoes–any kind of tomatoes really works well, even vine ripened or beefsteak tomatoes

Salt

Pepper

4-5 cloves of garlic, minced

1 tin of anchovy fillets, packed in oil and salted—don’t worry if you don’t like eating anchovies or worry that it’s too fishy. The anchovies will melt in the pan, and give your sauce the salt it needs, and a deep umami flavor. This is actually a trick I learned from Rachael Ray a while ago. I was skeptical when she added as well, but it takes the sauce to another level

1 tablespoon of crushed red pepper flakes

½ tablespoon of oregano, dried

½ tablespoon of basil, dried—if you’re going to serve this sauce right away, then a handful of fresh basil is a great way to finish the sauce before it gets tossed with some pasta

Olive oil

 To Make the Sauce:

  1. Set your oven to 400 degreesIMG_1888
  2. Add the grape tomatoes to a baking pan and toss with olive oil, salt and pepperIMG_1892
  3. Roast in the oven for 15-20 minutes as you complete the rest of the stepsIMG_1893
  4. Heat some oil in the bottom of a sauce pot on medium-high heat until very hot, but not smokingIMG_1894
  5. Add the anchovies to the pot. As they hit the hot pan, they will begin to melt. Make sure to break them up with a wooden spoon to help them alongIMG_1895
  6. As the anchovies are melting, add the garlic and cook together. Your kitchen will begin to smell amazing. Like your favorite Italian restaurant!IMG_1896
  7. Let the garlic and anchovies cook for a couple of minutes until the garlic browns a bit
  8. Add the red pepper flakes, oregano and basil to the pot and stir everything together for a couple of minutes more
  9. Add the canned tomatoes to the pot and scrape up any bits that might have stuck to bottom of the pot
  10. Reduce the heat to medium and add the roasted tomatoes to the pot as well. Stir well to incorporateIMG_1898
  11. Cover and cook for about 5-10 minutes. Resist the urge to keep checking on it. Let everybody get to know each other in the hot tub!
  12. Uncover and stir. Taste the sauce for seasoningIMG_1900
  13. If it tastes right, then use an immersion hand blender and pulse the sauce until it is mostly smooth but slightly chunky. If you like a smoother sauce, I would purée it up in a blender or food processor. I like a slight chunkiness to my sauceIMG_1901
  14. Continue to cook the sauce on the stove for another 3-5 minutes, uncovered this time aroundFullSizeRender-1

Once the sauce is ready, you can eat it right away, or store it. I always make a big batch of sauce, so I have some to use that day and a jar or two to keep in the freezer. If frozen, it’s good for a couple of months at least. You can use the sauce for pasta, lasagna, meatballs, pizza, as a base for chili, or any number or recipes.

Philly Burger Round Up: Week 2 – Good Dog Bar and Restaurant

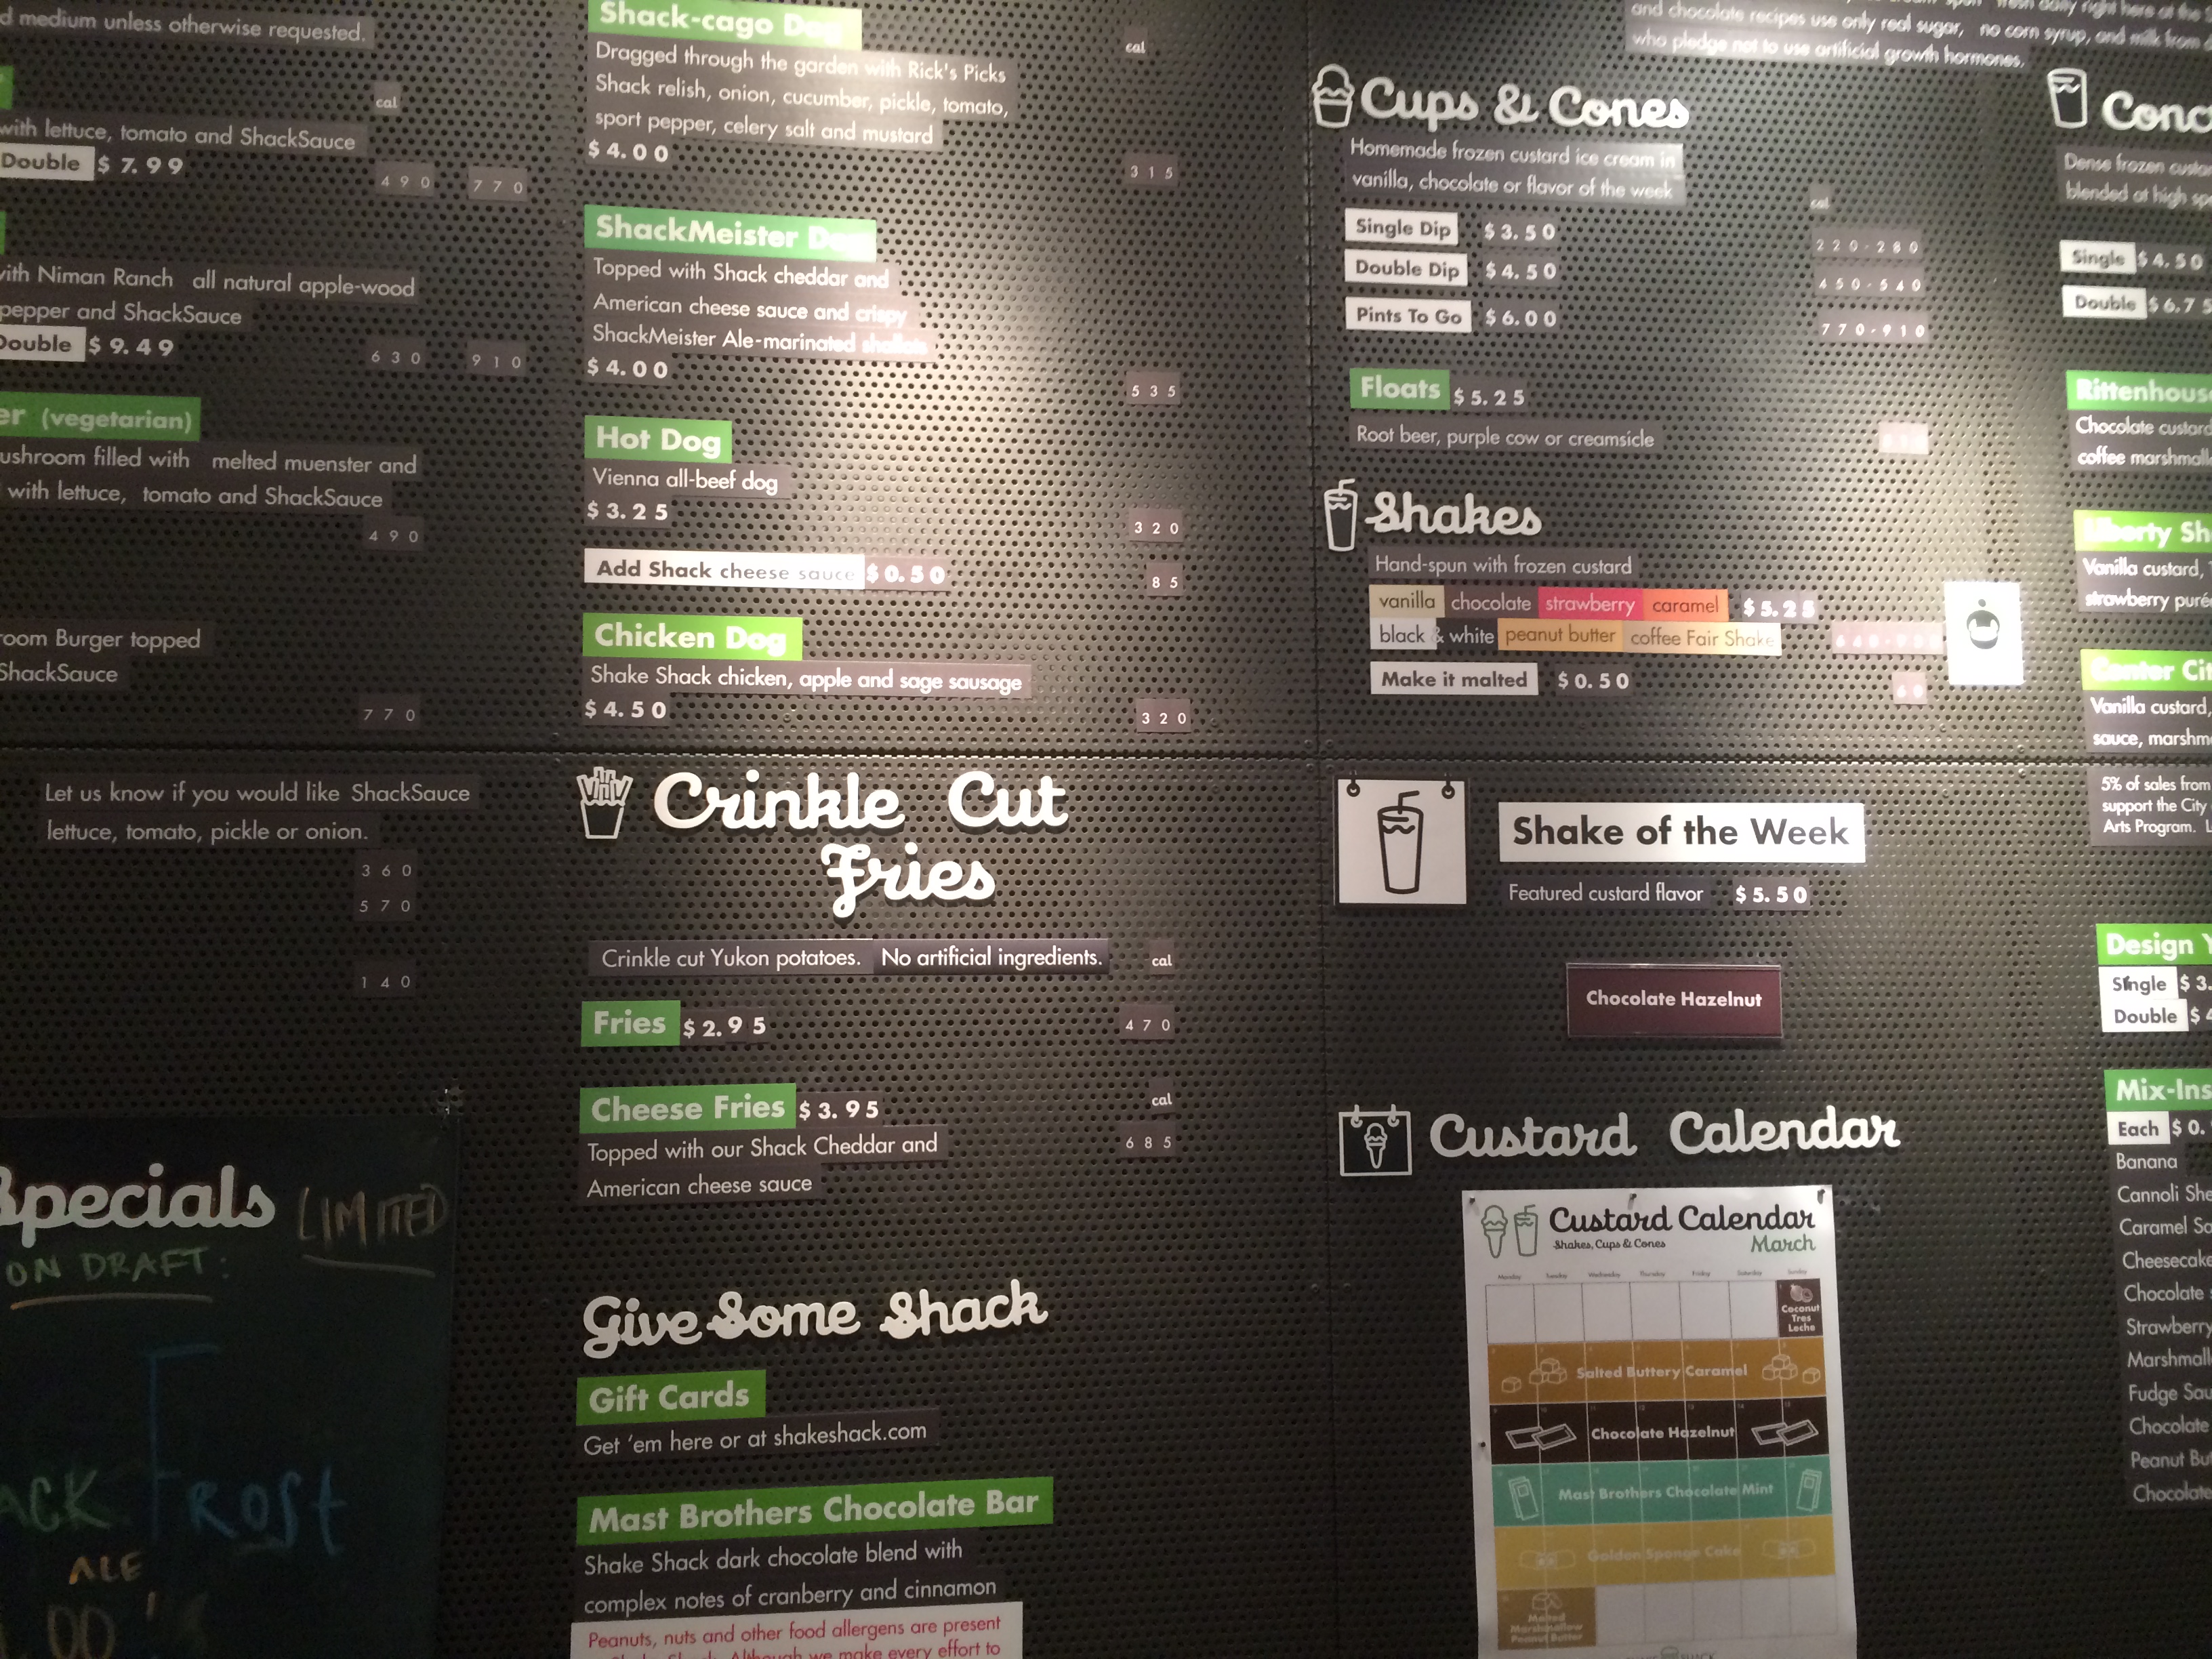
 For the second installment of my Philly Burger Round Up, I decided to visit the location of one of my first burger experiences in Philadelphia, Good Dog Bar and Restaurant. Good Dog Bar is a casual gastropub located on 15th Street in Center City that has been around for over 10 years. It has a decent selection of craft beers, creative cocktails, but most importantly, decidedly delicious food. This place is no frills in the best possible way, and the food is what matters in the end. The menu is made up of mostly modern comfort foods like burgers, Buffalo Shrimp, truffled cheesesteak empanadas, and one of my personal favorites, duck pot pie.   IMG_1726-0I went with a classic, the Good Dog ($12.50) burger, which consists of 1/2 lb. of beef—ground in house—stuffed with Roquefort cheese, and topped with caramelized onions. It’s served on a brioche bun. I ordered my burger medium rare, and it was cooked nicely—the temperature was spot on! The blue cheese inside the burger not only kept it moist, but also oozed out when I cut my burger in half. The onions weren’t too sweet, but gave the sandwich a nice change in texture. They were soft, but still chewy. The bun was a bit dense, but absorbed a lot of the burger juice. The sandwich didn’t need any ketchup since the burger was so juicy.

IMG_1728The burger came with a large side of mixed regular potato and sweet potato fries, which accompanies all of Good Dog’s sandwiches, as well as their signatures fry sauce—a homemade garlic aioli—for dipping. Aioli is similar to mayonnaise, but made with garlic and does not always have vinegar, and it is not as thick as mayo. The fries were fresh-cut and crisp, and the aioli helped cut through the heaviness of the burger and fries.

Overall, the Good Dog burger was delicious, and was everything a bar burger should be; it was comforting, juicy, meaty, no frills with great gourmet touches. It was a stick to your ribs kind of burger, and unique enough that it earns high marks. Always a classic, and all it needs is a good beer to help wash it down. Good Dog Bar has plenty of drinks and other tasty dishes to help complete your meal!

Grade: A-

Recipe – Passover Edition: Matzah Brei

FullSizeRender-9

It’s Passover this week, and I’m not back home after spending the past weekend eating big Seder meals and a lot of matzah. So, I felt that it was not only a good idea to share one of my favorite Passover recipes, but an obligation to dedicate a post to this delicious Passover tradition. We usually serve it for breakfast, but it’s delicious for lunch or dinner, and even when the holiday is over. In fact, many of the diners in NYC growing up would also make matzah brei around the Passover season.FullSizeRender

Matzah Brei, also called fried matzah by some, is almost akin to a matzah omelet, but so much better. It has great texture, delicious flavor, and is a great way to use up all that leftover matzah and eggs too! There’s a big divide about whether it should be served savory or sweet, but my family is sweet all the way! Although, this dish would also be delicious if you added some smoked salmon and onions to the egg mixture, and maybe some cream cheese on top—a play on Lox, Eggs & Onions. Sweet is really the one to beat though. Anyone else have a good matzah brei custom in their house? I’d love to hear all about it!

Ingredients:

2 sheets of matzah—say about 2 sheets per person, but you can make as much or as little as you want

3 eggs (per person)

1/4 cup of whole milk—skim is fine too, but whole gives a richer flavor

1 tablespoon and 1/2 teaspoon of ground cinnamon

4 tablespoons of white sugar

1/2 teaspoon of nutmeg

1/8 of a stick or 1 tablespoon of unsalted butter

1 pinch of salt

To Make the Matzah Brei:

  1. Use your hands to break up the matzah sheets into a colander—I recommend a colander with small holes or mesh so that pieces of matzah don’t fall throughIMG_1751
  2. Cover the matzah with water for 45 seconds to a minute—I know this seems weird, but it helps make the matzah pliable
  3. Drain the matzah really well
  4. In a medium to large bowl, crack the eggs and add the milk
  5. Whisk the eggs and milk together
  6. Add the salt, 1/2 teaspoon of cinnamon, nutmeg, and 1 tablespoon of sugarFullSizeRender-2
  7. Once the mixture is homogenous, add the matzah to the liquid and toss to coat all of the matzah with the eggsIMG_1752
  8. Heat a frying pan to medium heat and add butterFullSizeRender-5
  9. When the butter has melted, add the matzah and egg mixture to the panFullSizeRender-4
  10. Use a spatula or spoon to spread the mixture and shake the pan to get as much surface area exposure to the heat as possible. You should hear a bit of a sizzleIMG_1750 FullSizeRender-1
  11. While it’s cooking, mix together the cinnamon and the remaining 2 tablespoons of sugar to make cinnamon sugar. This is also great for cinnamon toast or for mixing into oatmeal!FullSizeRender-10
  12. Keep cooking until there are crispy edges and the eggs have dried up a bit—cook it to your desired consistencyFullSizeRender-8
  13. Plate the matzah brei and sprinkle the cinnamon sugar all over. The hot matzah brei will absorb the sweetness of the cinnamon sugar. Maple syrup is also a common matzah brei topping.FullSizeRender-7

Enjoy your delicious Passover breakfast!

Recipe: Bagels and Lox Pizza

I’m home this weekend for the Passover holiday aka “no carb week,” and many of my memories revolve around food. Since I grew up in New York City, Sunday mornings in our house usually consisted of bagels, lox, cream cheese, whitefish and more appetizing if company was coming. I was inspired to share my recipe for a modern twist one the classic bagel and lox sandwich.

 Lox is simply smoked salmon that has also been cured. It’s usually salty, and is a New York classic. My pizza recipe will help you stretch your lox farther, and this is a great dish to entertain with. Your guests will be so impressed with your creativity! 😉 Salmon, dill, lemon and creme fraiche come together to form an elegant dish that’s great for brunch, dinner or any time of the day!

Ingredients:

1 ball of pizza dough – you can make your own dough, but I find it easier to buy premade dough from the grocery store. You can also ask your local pizza place for a ball of dough, if you really love their crust. Most will sell it to you with no problem

1 container of crème fraiche

1 large lemon

2 tablespoons of capers, drained

1 medium to large shallot, chopped


 4-6oz of smoked salmon, roughly chopped

Fresh dill, chopped

Sesame seeds

Granulated garlic or garlic powder

To Make the Pizza:

  1. Preheat oven to 400 degrees, and if using a pizza stone, place it in the oven
  2. Grease your pizza pan with cooking spray all over
  3. In the meantime, stretch the dough by hand. Slowly start pulling the dough outward
  4. After it is stretched a bit, then use both hand and pass the dough through your hands, and slowly pull it a bit as you pass it through. It might feel like it will break, but the dough is strong, just keep going until its much wider
  5. Once the dough is very stretched, place it on your pizza pan and stretch it out to the edge. If it springs back, then use your fingers to push into the dough all over to keep it steady. In addition, poke it all over with a fork to stop it from rising too much in the oven. You want pizza, not bread!
  6. Once the dough is stretched to the edge of the pan, pour 1 tablespoon of olive oil over the top and make sure the whole top of the pizza has a light coating of oil
  7. Sprinkle the dough with garlic—use as much as you want, but I don’t recommend any more than a fine layer all over since it will overpower the salmon
  8. (Optional) On the outer edge of the dough, where the crust forms, sprinkle a layer of sesame seeds–this step is optional, but it’s a nod to the bagel inspiration behind this pizza. I like sesame bagels, but this would be great with some poppy seeds, and delicious with some eveeything seasoning if your local bagelry will part with some 
  9. Pop the dough into the oven and bake for 10-12 minutes  
  10. Remove the pizza crust and allow it to cool for at least 15-20 minutes. You might want to put it in the refrigerator or freezer for a few minutes if you’re in a rush  
  11. Once the crust has cooled, zest the lemon and add it to the crème fraiche. Mix well to evenly distribute  
  12. Spread the crème fraiche mixture all over the crust, leaving the sesame seed lined crust as a border of the pizza
  13. Sprinkle the pizza with some salt and a good amount of freshly ground black pepper  
  14. Allow the crème fraiche to set, and then spread your pieces of smoked salmon around the pizza. A nice single layer is best and will make sure your crust can hold all of the ingredients  
  15. Drain the capers, and sprinkle around the pizza—they will most likely fall into the crevices between the salmon pieces  
  16. Repeat this process with the chopped shallots—I like shallots since they’re not as strong as onions in terms of flavor, but give a nice onion-y flavor to the pizza. If you want a more mild onion taste, then chopped scallions are a good substitute. If you want something with a little more of a bite, then red onion is always great as well—just remember, raw onion is not as sweet or mild as cooked
  17. Scatter the dill all over the pizza. If some pieces are smaller or larger than others, that’s fine. I like my pizza a little more rustic, since it shows that it’s homemade!
  18. Add another pinch of black pepper and squeeze the juice of ½ of the lemon over the top  
  19. Use a pizza cutter, or a very sharp chef’s knife, to cut the pizza into 8 pieces    

Serve garnished with the other ½ of the lemon cut into wedges. Enjoy!

Philly Burger Round Up – Week 1: Shake Shack

Shake Shack – Center City
2000 Sansom Street, Philadelphia, PA 19103FullSizeRender-17

Shake Shack is a burger chain that’s modeled on a traditional drive-in. All of its locations have tasty burgers, hot dogs, frozen custards, milkshakes, and Shack brand beer. I came here the other day with some friends and left very full after a great meal.

FullSizeRender-19The Shack Stack ($9.49)* is my go to pick when I visit Shake Shack. There’s just something about the combination of mushrooms, cheese and meat that calls out to me. Specifically, the Shack Stack consists of a cheeseburger patty, topped with a ‘shroom burger, lettuce, tomato and shack sauce. They toast the inside of their hamburger buns, which are buttery potato buns of course. The buns are nice and sought in the outside, and ready to absorb juice on the inside with a great mouthfeel as you bite in. In addition, Shake Shack uses their own customized Angus beef blend from famous butcher, Pat LaFrieda, though the specific cuts and meat-to-fat ratio is a closely guarded secret. This fat is important because they cook their burgers on a wide griddle; as soon as it hits the flat top, the patties are mashed thin, and the fat not only greases the griddle, but helps the outside of the meat caramelize and develop a delicious crust. Plus, they use a cold patty, which makes sure that the burger juices stay inside as the fat starts to rapidly melt from the heat of the griddle. They let the crust develop before flipping too—so much flavor! The ‘shroom burger is their version of a veggie burger; it has a whole Portobello mushroom, which is filled with muenster and cheddar cheeses, breaded and fried until crispy.

Speaking of flavor, this sandwich is delicious! As you take your first bite of the burger you go through the fluffy bun and your teeth sink into the seared meat and break open the mushroom patty. You get a little bit of crunch from the lettuce, the ‘shroom patty starts to ooze cheese, the burger juices begin to run down your hands, you get the creaminess of the shack sauce and the buttery goodness of the bun. Thank god the tomato is there to provide a burse of freshness and cut through the decadence, lol. This burger should be saved for special occasions every day. In fact, this burger is its own special occasion! Just bring a lot of napkins to your table. 

FullSizeRender-18The ShackMeister Dog ($4.00) also made an appearance in my stomach on my most recent Shake Shack visit. Shake Shack actually started out as a hot dog cart in New York City’s Madison Square Park in 2000. This hot dog comes topped with a cheese sauce made from Shack cheddar and American cheeses, and crispy ShackMeister Ale marinated shallots. The dog was split and griddles so it had a nice snap, and also meaty chew. The shallots have a subtle onion flavor that doesn’t overpower the dog, and the cheesesauce is velvety and coats your tongue as you take a bite. This hot dog is rich and satisfying—not your ordinary cookout dog—and could be a meal on its own. Mustard isn’t necessary, but gives it a nice tang and a sharp bite that helps elevate the aromatic flavor of the fried shallots.

IMG_1537To round out the meal, I munched on some of my friend’s Fries ($2.95). Shake Shack fries are made from Yukon potatoes and are crinkle cut. They’re seasoned with salt, crispy and delicious. These fries make Nathans’ fries look stupid. The only thing that makes these fries better would be some cheese sauce for an extra $1. The restaurant has ketchup and mustard dispensers in the back with little cups for dipping. If you ask nicely though, they might give you a mini-cup of the Shack Sauce to dip your fries into instead!IMG_1536

Grade: A-
The Shack Stack burger would’ve gotten an A, if not for the price. The burger itself is actually kind of small for the hefty price tag, so it loses a few points. It’s definitely still worth it for the taste, and quality of the ingredients. Overall, delicious and always worth another trip!

* Prices listed are for the Philadelphia – Center City location.

Philly Burger Round Up

Behold the humble burger. Everybody loves a burger, all over the world. Why? One theory–my own–is that a hamburger is a cheap way to crave our carnivorous appetite. We want meat! Having the experience of biting into a meaty burger, chewing through the beef, juices running out of the patty, the texture of the bread, is an (almost) divine experience.

Feeling inspired by my recent gastropub night at home, in which I made a bistro style, French Onion burger, I’ve decided to search for great burgers around the city. Philadelphia might be best known for cheesesteaks and hoagies, but there are plenty of places–hidden or not–that offer a great burger experience. I hope you come with me as I search for the best local burger in my Philly Burger Round Up series.

McDonald's_Hamburger

Gastropub Night at Home

French Onion Burger with “German” Potato Salad

I was inspired to make this burger after a recent trip to Shake Shack (see next post) and thought I should make myself a great burger at home. The idea of the French Onion burger is actually a play on this amazing burger they have at a gastropub chain in the Los Angeles area called Father’s Office. The burger reminded me of French Onion soup, and gave off a very bistro vibe. They paired their burger with shoestring fries, and allowed no substitutions, but I’m pairing mine with potato salad. Mine is a twist on a traditional German potato salad, but incorporates many of the same flavors. Perfect for a picnic since there’s no mayo, but also great to make a whole bowl for yourself. I even use leftover potato salad to mimic a hash and top it with some chunks of avocado, a squirt of sriracha sauce, and a couple of fried eggs for brunch the next day.

Burger Ingredients

2/3 pound of ground beef—I used 75/25, which means the meat blend is 75% beef and 25% fat. I wouldn’t go with anything less than 80/20 because your burger may then dry out. If you do decide to use lean or extra lean ground beef, or something a naturally lean meat like turkey, then I would suggest cutting the meat with some ground bacon, just ask the butcher to do it for you, or pulse in the food processor.

Granulated garlic

Caramelized onions

1 small avocado, ripe

Arugula

2 packets of Laughing Cow Swiss Cheese (French Onion flavor)FullSizeRender-12

Gruyere cheese

1/3 of a French baguette or 1 mini baguette—this would also be good with a seeded Italian roll or Ciabatta. I liked the baguette because the who burger seemed very French to me. If making multiple burgers, feel free to use a whole baguette

Potato Salad Ingredients:

5-6 small red potatoes, halved

5 medium Golden potatoes, cut into chunks—this recipe uses what I had in my pantry, but you can use about 2-3 pounds of any kind of waxy potato (my favorite is Yukon Gold)

1 cup of salt pork or pancetta, cut into cubes

2 medium shallots, chopped fine

3 cloves of garlic, minced

½ cup of apple cider vinegar—traditional recipes usually call for white vinegar, but I feel that the apple cider vinegar is a little sweeter and has a little bit more of sour taste

2 tablespoons and 1 teaspoon of sugar

1 heaping tablespoon of whole grain dijon mustard

1 tablespoon of fresh parsley, chopped

3 tablespoons of olive oil

To Make the Potato Salad:

  1. In a large pot, place the potatoes and enough water to cover them with a good amount of salt.
  2. Heat the potato pot on high heat until they start boiling, then reduce heat to medium to medium-high heat and continue on a low boil for at 15 minutes
  3. Test the potatoes with a knife. If the knife slides in easily then they are done. Don’t worry, you can always just taste one if you’re unsure
  4. Drain the potatoes and set aside
  5. In a large sauté pan, heat 1 tablespoon of oil on medium heat until hot, but not smokingFullSizeRender-9
  6. Add salt pork to the pan and use a wooden spoon or rubber spatula to spread the cubes in a single layer—this will help them brown evenly and prevent burning. Stir every couple of minutesFullSizeRender-11
  7. When all of the pieces are browned all over, remove from the pan, but leave the fat from the pork in the pan—flavor! Drain the pork on a piece of paper towel. While you prepare the rest of the ingredients the pork will crisp up
  8. In the same pan, add the shallots and garlicFullSizeRender-14
  9. Add 1 teaspoon of salt and black pepper each, and 1 teaspoon of sugar
  10. Cook the shallots and garlic until browned and fragrant—your nose will let you know 😉
  11. Once they’re browned, deglaze the pan with the vinegar
  12. Reduce for 1-2 minutes on medium-low heat, then add the mustard and parsley. Stir to incorporate along with another pinch of salt and pepperFullSizeRender-15
  13. Add 1 tablespoon of olive oil, and stir the sauce/vinaigrette
  14. Turn off the heat
  15. Add the potatoes and the pork back to the pan, and toss with the vinaigrette to coat all of the potatoes while they’re still warmFullSizeRender-16
  16. Let the potato salad sit while making the burger—this potato salad could be made a day in advance. Traditionally German potato salad is served warm, but it’s great at room temperature or even cold

To Make Caramelized Onions: 

  1. Heat your oven to 350 degrees
  2. In an oven-proof pot with a lid, or a dutch oven, coat the bottom of the pan with olive oil and add 2 pats (1/8 tablespoon) of butter
  3. Add the onions and cook, uncovered, on medium heat for a few minutes until they start to sweat
  4. Once the onions start to turn golden, cover and put the pot in the oven
  5. After 20 minutes, stir the onions and add 1 teaspoon each of black pepper and salt
  6. Cover and put onions back in the oven for an additional 20 minutes
  7. Add 2 tablespoons of sugar and stir the onions
  8. Cook for an additional 30 minutes
  9. Uncover, stir, and cook for an additional 10 minutes
  10. Take the onions out of the oven, they should be brown and caramelized—leave the oven on for the burger afterwards though
  11. Place the onions in a bowl and set aside to top your burger, or use them in an omelet, in pasta, or in one of my personal favorites—pizzaFullSizeRender-10

To Make the Burger:

  1. Remove the meat from the refrigerator at least 20 minutes before you plan to cook—this will help with even cooking
  2. Shape your burger patty—I went with a long burger in order to fit the bread, but a traditional round patty is always good
  3. Season both sides with a good pinch of salt, black pepper and granulated garlic
  4. Heat your pan on medium heat for a couple of minutes and add the remaining olive oil to the panFullSizeRender-2
  5. Add the meat to the pan—you should hear a nice sizzle when the meat hits the hot pan. Resist the urge to move the burger or squish it down. This way it will form a nice crust and stay juicyFullSizeRender-3
  6. After 2-3 minutes, flip the burger over and cook on the second side for an additional 2 minutesAdd a pat of butter to the pan and place the pan in the preheated oven
  7. In the meantime, take your sliced baguette and spread the Laughing Cow cheese packets on the bread and put into the oven at the same time
  8. Cook for about 5-7 minutes for medium donenessFullSizeRender-7
  9. Remove the bread and burger pan from the oven and let the burger rest for a few minutes
  10. Increase oven to broiler setting
  11. (Optional) I like to add the pan drippings from the burger pan to the potato salad along with another pinch of salt—it makes the potato salad even creamier, and ties the flavors together well. Trust me, it sounds decadent, but you’ll love it!FullSizeRender-1
  12. Add a handful of arugula to the bottom half of the sandwich
  13. To the top half, add the sliced avocado to the top half and a layer of caramelized onionsFullSizeRender-5
  14. Top the bottom half with the burger, then top that with a few slices of Gruyere cheese
  15. Put under the broiler for an another minute just to melt the cheeseFullSizeRender-4
  16. Remove the bottom half of the sandwich from the ovenFullSizeRender-8
  17. Combine the two halves, take a minute to admire the delicious picture, and cut on a bias

Enjoy your amazing gastropub style burger at home with some potato salad on the side – don’t mind the mess. In fact, if your burger isn’t messy, then you’re doing something wrong!

Creamy Tomato Chicken Pasta

The first time I made this dish wasn’t actually at home. I was on vacation in the UK, and staying by a friend for a few days in Birmingham, England. I had been going out for most of my meals, and I thought it would be a nice change to not only have something homemade, but also cook a meal that my friend could have as leftovers for a few days after I left. I didn’t want to spend a lot of money, since I was a traveler on a budget, and the chicken thighs at Tesco looked really good that day. if you want something that might be fancier than chicken, if you’re entertaining with this dish, then some meatballs would be a nice substitute. After forming the meatballs, I would brown them for a couple of minutes on each side in a pan, and then let them finish cooking in the sauce.

Pasta is a great way to spread a dish out over a few meals, and it’s also an easy way to stretch a protein into several portions. This dish is creamy, comforting, and easy to make—it will stick to your ribs and definitely make you want another plate, so make sure to make the whole recipe, even if you live on your own—the leftovers are amazing. This dish only gets better the next day!

Ingredients:

1 package of boneless, skinless chicken thighs

1 cup of pancetta cut into cubes—if you don’t have pancetta, then salt pork would be a good substitute though it has less meat so you’ll have to use slightly more of the block. Bacon is ok too, just make sure it’s not flavored too heavily, and that it’s thick enough to cut into lardon-sized pieces

1 28oz can of crushed tomatoes—I prefer San Marzano tomatoes since they’re sweeter, but any brand should be fine. A fun variation of this recipe is to use fire roasted diced tomatoes along with a few sun-dried tomatoes then pulse them in the blender until a sauce forms, but not completely smooth

Granulated garlic or garlic powder

3-4 cloves of garlic

1 large Spanish onion (or 2 medium)—any onion is fine really, except for red, which I feel has a little too much bite for this recipe

1 package of Baby Bella or Cremini mushrooms, halved—white button mushrooms are also fine, but cremini have a little more flavor. I think large Portobello mushrooms are too bold for a dish like this. If you were to use them, then I may suggest using a heavier protein like turkey cutlets

¼ cup of white wine—use something you would drink. If it doesn’t taste good straight up, it won’t taste good concentrated in your dish!

1 cup of heavy cream

Olive oil

1-2 teaspoons crushed red pepper flakes—adjust to your own taste. I like spicy, but feel free to omit the pepper flakes if you prefer a milder sauce

1½  teaspoons of dried oregano

1 tablespoon of fresh basil, roughly chopped

1 box of fusilli or rotelle—I like to use a pasta shape that will hold a lot of the sauce and is bite-sized

Parmesan cheese (garnish)

Cooking Steps:

  1. Cut all of the chicken thighs in half
  2. Season the chicken liberally with salt, pepper and granulated garlic.
  3. Add enough oil to coat the bottom of a large, deep skillet, and turn the burner to medium heat.
  4. After a couple of minutes, add the chicken to the pan. Try to make sure that the chicken is in a single layer, and that they all get some pan space. This way they cook in about the same timeIMG_2863
  5. Cook the chicken for a few minutes, flipping occasionally, until it’s browned, but not cooked through. Don’t worry; it will finish cooking in the sauce later.IMG_7134
  6. Remove the chicken from the pan and set aside in a bowl or a plate for later
  7. In the same pan, add the pancetta and cook—stirring occasionally so that the pieces don’t stick to the bottom of the panIMG_2477
  8. When all of the pancetta has browned and has a crispy exterior, remove to the same bowl as the chicken. Resist the urge to drain them or place on a paper towel—trust me, you’ll want this fattiness later!IMG_9331
  9. Add garlic and sauté for 30-45 seconds on medium to medium-high heat until it starts to brown, but pay attention. Burned garlic can ruin a dish!
  10. Add the onions and sauté for about 5 minutesIMG_7298
  11. Once the onions start to brown and caramelize a bit, add the mushrooms—again, you should make sure the onions and mushrooms are spread around the pan, and stir occasionally, so that they all get some “sizzle”IMG_3043
  12. Add the dried oregano and crushed red pepper flakes, as well as well as ½ teaspoon of salt and a teaspoon of black pepper—hold off on adding any extra salt since the pancetta will lend some saltiness to the sauce. You can always add more later!IMG_5693
  13. When the mushrooms are cooked tender and the onions have continues to caramelize, deglaze the pan with the white wine. Make sure to scrape up all the bits from the bottom of the pan. That’s pure flavor!FullSizeRender-1
  14. Let the alcohol cook off for a couple of minutes and then add the tomatoes to the pan
  15. After 2 minutes, add the chicken and pancetta back to the pan along with the basilIMG_6382
  16. Reduce the heat to medium-low and simmer for 12-15 minutes, and stir it after about halfway to make sure it doesn’t stick to the pan and move everything aroundIMG_5863
  17. About halfway through the previous step, put your pasta water on to boil.
  18. Cook the pasta according to package directions—the only unique thing I do in this dish is add a clove of garlic, roughly chopped, to the pasta water in order to give the noodles a subtle garlic flavor, and make sure to add a nice amount of salt since it will flavor the noodlesIMG_8148
  19. When you drop the pasta into the pot, add about 1 cup of heavy cream to the sauce (or 3 turns around the pan). Stir to incorporate well into the sauceIMG_6979
  20. Drain the pasta when it’s al dente, even if you like it softer since it will continue to cook in the sauce for a couple of minutes.IMG_4452
  21. Add the pasta to the sauce pan, and mix the pasta, sauce, chicken, pancetta, onions and mushrooms all together. You want the noodles to be completely covered in sauce, but not swimming in it. Simmer together for another couple of minutes.IMG_4359
  22. Add a few big spoonfuls of the dish on a big plate or shallow bowl, and garnish with some Parmesan cheese, freshly cracked black pepper, and maybe a sprig of fresh basil

IMG_1796

Buon Appetito!